Yoga BLOG

Urdhva Prasarita Padasana: Legs stretched upwards to strengthen the abdominal and back muscles

by Nick on Feb 17 2017
Urdhva Prasarita Padasana: Legs stretched upwards An asana that is quite simple to perform and very effective in its effects is "Urdhva Prasarita Padasana." Translated from Sanskrit, urdhva means "upward" or "above," prasarita means "outstretched," pada means "foot," and asana means "posture." This translation should give you an idea of how to perform this yoga pose . You lie on your back and swing your outstretched legs from the floor into a 90-degree bend, then back down again. This movement is performed several times, for at least a minute. Instead of resting your outstretched legs on the floor, you let them hover just above the floor and then bring them back up simultaneously. The movement of Urdhva Prasarita Padasana strengthens your abdominal and back muscles and helps you improve your overall posture. Deep muscle training for the abdomen When performing Urdhva Prasarita Padasana, the psoas muscles are primarily targeted, a particularly deep muscle located behind your abdominal organs that is usually difficult to reach. The psoas, also known as the psoas muscle, attaches to the front of the lumbar spine in the lower back area, runs along the inner side of the pelvis, over the pubic bone, and to the inner surface of the femur. This muscle group is particularly important for your overall body structure, posture, and movement, and also influences digestion. Due to the way these muscles are positioned, performing Urdhva Prasarita Padasana can not only have a positive effect on your lower abdominal muscles, but also on strengthening your lumbar region. Thus, Urdhva Prasarita Padasana can strengthen your psoas and back muscles and improve your overall posture. To perform this asana correctly, however, you should have the right mental image to avoid back and hip injuries. The image of a marionette can be helpful here. How to perform Urdhva Prasarita Padasana correctly Imagine your legs are being guided into position by the strings of a puppeteer sitting on your lumbar spine. This is because the movement should be guided precisely from this area of the body to be performed correctly. Exhale on the upward movement and inhale again on the downward movement. There should be no hollow space in your lumbar region; in other words, your back should remain completely flat on the floor during this asana. If your back lifts off the floor, it's an indication that you still lack the necessary abdominal muscles to perform Urdhva Prasarita Padasana correctly. To help, instead of placing your hands on the floor to the right and left of your body, place them palms down under your hips. This hand position can help you perform Urdhva Prasarita Padasana without causing lower back pain. Instead of placing your hands under your hips, you can also place your fingertips on your lower abdomen, below your belly button, and feel your stomach tense. It's also helpful to place your arms and hands above your head, fully extending your arms and thereby shifting your center of gravity. Urdhva Prasarita Padasana in practice Only lower your legs as far as you can while keeping your lower back stable on the floor. Roll your tailbone toward your heels and tuck your navel toward your spine. Extending your arms upward allows you to lengthen your waist and ribcage and shift your center of gravity. Repeat the up and down movement several times, increasing the number of repetitions over time. Hold your legs in the lower position for five to ten seconds initially, gradually increasing this position to up to one minute. Image © rognar / 123rf.com

Jathara Parivartanasana: Letting go in a twist

by Nick on Feb 14 2017
Jathara Parivartanasana: Letting go in a twist It's one of the favorite poses of many yogis: Jathara Parivartanasana is an incredibly relaxing pose associated with several valuable benefits for the body, mind, and soul. This abdominal twist is not only suitable as a regular part of your yoga practice but also serves as a gentle way to wind down after a strenuous workout. As with many other yoga poses, the Sanskrit name of Jathara Parivartanasana already explains the exercise: "Jathara" translates as "belly," and "parivarana" means "to move back and forth." The asana is a twist of the abdomen, performed in a comfortable supine position. In descriptions of yoga exercises, you'll therefore often find Jathara Parivartanasana referred to as "belly twist" or "lying twist." Correct execution is important At first glance, Jathara Parivartanasana appears to be an effortless pose. However, as with all other asanas, you need to pay attention to a few things to protect your body from excessive strain and to enjoy the beneficial effects of this pose. Begin the exercise in a relaxed supine position. Depending on the variation—in Jathara Parivartanasana, you can bend both legs or just the upper leg—bend one or both knees and draw them toward your chest. With your next exhalation, gently lower your legs to the floor and move your head to the opposite side. Your arms are stretched out on the floor at your sides. Close your eyes and hold the asana for six to ten breaths. Then switch sides. Two things are particularly important in this attitude. First, you should make sure your hips stay upright. Second, it's crucial for alignment that both your shoulders remain on the floor, or rather, on the mat. Important: Never exert strong pressure on your knees unless they flow to the floor through gravity alone or with the gentle support of your hand. Be patient and let go—both physically and mentally. With time and some practice, the flexibility in your core will improve. Individual variants possible If you're a beginner and want to gradually get used to Jathara Parivartanasana, you can rest your knees on a cushion while twisting. If you're an advanced yogi or find this pose particularly easy right away, you can further strengthen the twist by gently pushing your upper knee toward the floor with your hand. Relaxation and energy This exercise clearly demonstrates that relaxation and the influx of new energy are not mutually exclusive in yoga. In many cases, you'll feel the restorative effects of Jathara Parivartanasana immediately. This is why the exercise is often placed at the end of a yoga class with intensive practice. You'll also notice how the twist pleasantly stretches the lateral muscles of your back and relaxes your back. Your spine recovers in the neutral position, and your intervertebral discs are replete with the fluid necessary for their cushioning function. With extended practice, you may notice how Jathara Parivartanasana can also improve any back pain or your digestion. The asana has a detoxifying effect on your body and can also restore balance to your nervous system. The energetic effect of Jathara Parivartanasana is located in your torso area: The relaxing abdominal twist affects both the navel chakra and your heart chakra . Few restrictions The lying abdominal twist is beneficial for almost all yogis (especially after forward and backbends!) and also for athletes. However, you should be careful if you have chronic complaints or conditions in the lower back, hips, or knees. In these cases, you should consult your doctor beforehand or ask your yoga instructor for an alternative. Image © fizkes / 123rf.com

Chakrasana - a path to heart opening

by Nick on Feb 08 2017
Chakrasana - a path to heart opening There are always yoga poses that beginners, in particular, believe they will never be able to achieve. These include headstands and crow 's pose, as well as Chakrasana, the wheel. Those who encounter this pose for the first time often believe they will never be able to muster the necessary strength and flexibility, and perhaps even the courage. At the same time, Chakrasana also shows that with a gentle introduction and preparatory exercises, more is possible than you might think. This applies not only to your yoga path, but to your entire life. The wheel of your body You're probably familiar with the yoga term Chakrasana (Sanskrit: chakra = wheel) from your childhood. Even in school classes or children's gymnastics classes, the so-called "bridge" pose is a classic exercise. The practitioner stands on their hands and feet, their entire body forming the bridge, with the belly facing upward. Through the bend, the positions of body parts and organs shift relative to each other: Now the belly is higher than the heart, which is why Chakrasana is one of the inversions in yoga. Flexibility and strength The Wheel Pose is an asana that trains numerous muscles. It primarily strengthens your hands and arms, feet and legs—but also your buttocks. Chakrasana is also an important element in the practice of many yogis for effective stretching. You stretch the muscles of your entire front side, especially in the thighs, abdomen (this also boosts your digestion!), chest, shoulders, and neck. Many people who come to yoga want to improve their back health, especially their spine. Chakrasana is a classic backbend that increases back flexibility and can protect against injury. If you want to try this challenging asana, which is one of the more advanced yoga poses, but have back problems (especially in the lumbar spine), it's best to consult your doctor beforehand or ask your yoga instructor to show you an easier variation of the wheel. Physical and mental strength Chakrasana is a yoga pose that beautifully demonstrates the connection between body and mind, between external and internal posture. The backbend not only opens the chest and abdominal area physically. "Opening the heart" also means approaching life and other people with openness. It's clear that you need a certain amount of strength, especially in your arms, to assume Chakrasana. However, you can develop this gradually with targeted exercises. Even with strengthened muscles, you will still need a certain amount of willpower to commit to and maintain the asana in the yoga wheel. This experience not only shows you your stamina, but also helps you endure and master situations in everyday life. This strengthens you a little more each time. Energy for your chakras Chakrasana has the word chakra in its name. It's no wonder that this asana has an activating effect on two of your chakras. First, of course, on your heart chakra (Anahata Chakra) , which brings love, devotion, and lightness to your life. Second, through the backbend, you also stimulate Vishuddha, your throat chakra . Your energy circulates here, which has a purifying effect on your emotions and helps you show others who you are. Your path to Chakrasana To get into bridge pose, lie on your back with your knees bent on your mat. Place your hands on the floor to the right and left of your head. Stretch your chest upwards and gently place your head on the mat. Beginners can stay in this position; more advanced yogis can push themselves up until your arms are almost (or fully) extended at the elbows. There are wonderful exercises for the necessary strength and flexibility that are accessible even to yoga beginners . For example, you can improve your arm strength in the plank pose (Chaturanga Dandasana) . You can train your back flexibility statically in the camel pose (Ustrasana) or more dynamically with the classic sun salutation (Surya Namaskar) . Image © fizkes / 123rf.com

Uttana Padasana - the stretched foot pose

by Nick on Feb 05 2017
Uttana Padasana - the stretched foot pose A particularly graceful yoga pose is Uttana Padasana (also: Uttanpadasana), the extended foot pose. This exercise comes in several variations. But that shouldn't confuse you, because there's no "right" or "wrong" in yoga anyway. The key is to find the pose that's right for you. The somewhat simpler (but no less effective) pose is lying on your back with legs together and stretched vertically upwards. Especially in Ashtanga Yoga, you'll often see a form of Uttana Padasana, where the back arches off the mat and only the hips and back of the head are on the floor. In this advanced form, the outstretched arms and legs reach diagonally forward and upward. In both forms, the translation of the name of the pose from Sanskrit already typically explains its appearance: "Utta" means "upward facing", "Pada" means "leg" or "foot". For your belly - inside and out If you try Uttana Padasana for the first time, you might be surprised: The asana looks very simple at first glance, but this first impression is deceptive. Raising your legs vertically (or, in the slightly more difficult version, diagonally upwards) will require all your abdominal muscle strength. But that's a good thing, because the strain will strengthen your abdominal muscles. This is especially beneficial for people who suffer from lower back pain. Uttana Padasana also has an effect on the inside of your torso: digestive problems such as bloating or constipation can be gently relieved. Furthermore, the return of blood from the legs after a long day at work is not only very pleasant, but can also decongest veins and promote circulation. Stimulate the chakras The advanced variation of Uttana Padasana energizes the throat chakra through the backbend in the cervical spine. This is where your emotions are purified, allowing you to face the world authentically again—as you truly are. In Uttana Padasana, you are simultaneously connected to the mat (more or less depending on the pose) and stretch your legs (and possibly arms) upward. You simultaneously feel the comforting grounding in the earth and the urge to connect with the highest. Practice individually To start, the easier version of Uttana Padasana is a good choice. Tighten your stomach and glutes as you raise your legs from a supine position. Keep your lower back firmly planted on the mat to protect your spine. If you need a slightly easier asana, lift one leg first, breathe five to ten times, and then lower that leg back down. Tip: If you actively press your palms into the floor next to your body, this support will help you lift your legs more easily. In the advanced variation of Uttana Padasana, correct exercise execution is particularly important. This applies, firstly, to the sensitive cervical spine. Here, it's important to lower the back of the head gently and never abruptly. Furthermore, hyperextension should always be controlled and should never cause pain. The same applies to your lumbar spine: Even if your back lifts off the mat in this variation, always be careful to avoid an unhealthy arch by maintaining controlled core tension. Control and letting go Important: In either form of Uttana Padasana, you should only stay as long as your abdominal muscles can support the weight of your legs. As a general rule, the closer your legs are to the floor, the more difficult the asana becomes. If your abdominal muscles are too weak or tired, you'll notice a hollow back or a tightening sensation in your lower back. It's time to exit the pose in a controlled manner and move into a position where you can relax the most! Image © djoronimo / 123rf.com

Supta Konasana: new perspectives in the lying angle

by Nick on Feb 02 2017
Supta Konasana: new perspectives in the lying angle Anyone who practices yoga quickly realizes that among the numerous asanas, there are also a whole range of inversions. These have different effects on the body, but sometimes even more so on your mind and soul. Worries and fears often arise precisely when our minds are going around in circles and we're stuck in our old thought and behavior patterns. With a kind of tunnel vision, we see ourselves and our surroundings only in a very limited way. A way out seems impossible. With inversions, yoga helps us turn our world upside down in a positive sense and gain a different, often valuable and helpful perspective on things. One of these poses is Supta Konasana, the Reclining Angle Pose. Asana from Ashtanga Yoga The term Supta Konasana comes from Sanskrit. "Supta" means "lying" or "sleeping," and "kona" translates as "angle." You'll find this pose in the Primary Series of Ashtanga Yoga . The reclining angle pose is a variation of the plow pose (Halasana) . As in the plow pose, the yogi lies with only the shoulders on the mat and has raised their legs above their head to the floor. However, unlike the closed legs in the plow pose, in Supta Konasana the legs are spread wide, forming an angle. The arms are also behind the head. The thumb and index finger grasp the big toe on the same side of the body. Valuable effects With the reclining angle pose, you enter a posture that has a holistic effect on the balance of body, mind, and soul. First, this asana stretches the often shortened muscles on the back of your legs and your lower back. Your core muscles are strengthened, creating a stable center. It can also gently stimulate your thyroid, thus enhancing its function. Supta Konasana also activates your throat chakra , which is responsible, among other things, for your ability to communicate. If you sometimes find yourself at a loss for words when faced with certain situations or events, the reclining angle pose is ideal: relaxing and energizing at the same time, you can rediscover your language and express yourself as you need. Getting into Supta Konasana correctly Begin in Dandasana (Stick Pose) , sitting on your mat with your legs stretched and your back straight. Now, engage your core muscles in your stomach and back and gently roll back as you exhale. The pressure of your palms on the floor can help. Spread your legs behind your head, grasp your big toes with your first two fingers, and gently place them on the floor. Immerse yourself completely in this unfamiliar pose and take at least three to five full breaths. An alternative is to spread your legs while sitting and clasp your toes. Then, from this position, roll into a lying angle. This approach is a bit more difficult, as you don't have the support of your arms when rolling back, and you have to draw most of your strength from well-trained abdominal muscles. Helpful ways to the lying angle Not every yogi can master this Ashtanga Yoga pose right away. But that's okay, because you can approach the position step by step, according to your abilities. If you lack the flexibility to grasp the straight and bent legs in the inverted pose, you can practice this position while sitting until you have achieved the necessary flexibility. However, you may find the unfamiliar inverted pose too uncomfortable at first. You can help yourself here by placing your feet against a wall after rolling back into Supta Konasana, or simply on the sofa at home. Over time, you will be able to become more involved in this restorative asana and gradually move your legs deeper. Image © byheaven / 123rf.com

Salamba Shirshasana - the supported headstand

by Nick on Jan 30 2017
Salamba Shirshasana - the supported headstand Salamba Shirshasana is the Sanskrit name for the supported headstand. It is derived from the following combination: "Sa" stands for "with," "alamba" refers to the support, and "sirsa" is the name for the head. The pose is classified as an inversion pose. In terms of difficulty, it can best be described as "moderately difficult" to "relatively easy." The supported headstand stimulates several parts of the body, especially the neck, arms, torso, and shoulders. Overall, however, it is a good exercise for the entire body. Salamba Shirshasana works best with two yoga blocks and a wall for support. Performing Salamba Shirshasana Salamba Shirshasana can be performed with one or two supports. For the single-support variation, lean your back against the wall to make the pose easier and more comfortable. You can gain additional support by resting your shoulders on the two yoga blocks mentioned above. In this case, your head would be centered between the blocks. This additional support can be particularly helpful for beginners, not only because it helps but also because it provides additional security for the first two or three times you do it. Once you've gotten used to the supported headstand, the wall is sufficient support. As the name suggests, this exercise doesn't require any support at all. To perform Salamba Shirshasana for the first time, position yourself on your knees facing a wall with two yoga blocks roughly the same distance between your shoulders. The blocks are on the floor and remain there throughout the pose. In the second step, bend your entire body forward, bringing your face closer to the wall. In this step, position your hands in front of the two blocks, ideally with your fingertips lightly touching them. Similar to a forward roll, position your shoulders on the block to your left and right. Stretch your head straight towards the floor so that the top of your head touches the floor. Keep your hands in front of the blocks, with your fingertips lightly touching them. In the next step, straighten your legs and lift your bottom upwards. You are now in the ideal position to slowly move into supported headstand. First, raise one heel toward your bottom, then raise the other leg, assuming an "egg shape." In this position, you are already in an upright position, but your legs are still tucked in, so your knees are leaning toward your head. Here, you can take a deep breath. In the final step, slowly extend your legs toward the ceiling: this will bring you to Salamba Shirshasana. Once you've reached this point, it's up to you whether you want to use the wall for additional support. Regardless of whether your legs are swinging freely or leaning against the wall, you should remain in the Salamba Shirshasana position for at least three deep breaths. It's important to keep all parts of your body active throughout the entire exercise and to be aware of your position in space. If you want to end the supported headstand after at least three breaths, do so as carefully and consciously as you entered the position. Therefore, first lower one leg slowly towards the floor and then pull the other leg up halfway. This successfully completes Salamba Shirshasana as an exercise. Image © fizkes / 123rf.com

Janu Shirshasana - the head-knee pose

by Nick on Jan 27 2017
Janu Shirshasana - the head-knee pose Janu Shirshasana, the head-to-knee pose, is a popular asana in Hatha Yoga . It is a one-legged forward bend. Shirsha represents the head and Janu the knee. The following guide explains what Janu Shirshasana is, how to perform the yoga exercise, and what benefits it can have on your body, health, and yourself. What does Janu Shirshasana mean? Janu: the knees Shirsha: the head Asana: the posture or position How is Janu Shirshasana performed? Sit on a mat. Your back should be straight so that you are sitting upright. Your chest should be lifted and your neck long, with your hands next to your hips. Your shoulders should be low and your face relaxed. Take a few breaths in this position. To perform the yoga pose Janu Shirshasana, you can then stretch out one leg, place your hands on your foot, and then move your head towards your knee. It is best to move your chin towards your knee or your head towards your feet. You can do this according to your level of fitness and change it over time. Breathe in as you do so. You will notice that the longer you stay in the pose, the better the effect. You can come out of the pose either by standing up with a straight back and extended arms and then switching sides, or by rolling up vertebra by vertebra. Who is Janu Shirshasana suitable for? The Knee-Head Pose, an optimal floor exercise, is suitable for beginners and advanced practitioners. It is easy to learn even without yoga experience. Janu Shirshasana is usually integrated at the end of a yoga practice. Beginners can place a pillow under the bent knee for support. As a beginner, you only bend forward as far as you can while your back is straight. Try to gently sink forward a little more from the hips with each exhalation. The more you practice the exercise, the better you will generally be able to move your head towards your knees. Another good option is to initially place a yoga strap around your feet, grasp the ends, and gently pull yourself forward. Beginners are advised to seek guidance from a yoga instructor to avoid mistakes and to avoid harming the body through the Head-Knee Pose. What are the positive effects and benefits of Janu Shirshasana? The mobility of the thigh muscles, hips, and back can be improved through the head-knee pose. The abdomen and legs can be strengthened, toned, and toned. The spine is usually stretched, and the hips opened. A stiff back or tense hamstrings can be loosened through Janu Shirshasana. The exercise often has a relaxing effect on the back and neck muscles. The asana acts like a massage of the abdominal and pelvic organs. Janu Shirshasan can therefore have a positive effect on digestion and thus help with related problems. The exercise is recommended for all urinary tract disorders, as it can contribute to healing. The head-knee pose is also often helpful for intestinal colic and prostate and uterine problems. Furthermore, kidney and adrenal function can be strengthened. Because you become highly energized, weakness and lack of motivation are usually eliminated. Stress reduction is promoted, and blood pressure stabilizes. Conclusion Janu Shirshasana is a yoga pose with numerous benefits for the body and mind. Correct execution is crucial. Avoid sudden movements. The same applies to strenuous exercise. The effect of the asana lies solely in the continuity. Janu Shirshasana is not recommended for people with knee, back, or thigh problems. People suffering from diarrhea or asthma should also avoid the head-to-knees pose. Image © sergeyp / 123rf.com

Eka Pada Sarvangasana - supported shoulder stand

by Nick on Jan 24 2017
Eka Pada Sarvangasana - supported shoulder stand Shoulderstand is one of the classic Hatha Yoga poses. This fundamental element, along with the Sun Salutation (Surya Namaskar), is often taught in beginner classes. While this asana isn't easy for every beginner to perform right away, it's one of the poses that, with effective support, can be quickly incorporated into any yoga practice. This is due to its holistic effects on body, mind, and soul. Eka Pada Sarvangasana, the supported shoulder stand, is a good way to learn this asana, which is so beneficial for your well-being, or it's an alternative that you can incorporate into your practice again and again. Beneficial effects You're surely familiar with the feeling when everything becomes too much. When not only your body feels full and sluggish, but your mind also seems to be crammed with information. When you feel physically tired and emotionally overloaded, Eka Pada Sarvangasana is a way to feel light again. Firstly, you'll clearly feel the inverted posture releasing any accumulated fluid from your feet, legs, and abdomen, making it easier to excrete it later. This helps cleanse toxins—in short, everything that unnecessarily burdens your body. If you're trying to lose weight, shoulder stand is also a helpful asana. Through the increased blood flow to your brain, you'll also experience how your nervous system is revitalized and re-energized in Sarvangasana. The three upper chakras of your body are noticeably revitalized, which you'll notice, for example, in an improved ability to concentrate or learn. At the same time, your thoughts calm down, and your soul regains balance after the stress and hectic pace of everyday life: It's not for nothing that shoulder stand is a pose that has a lot to do with balance—both internally and externally! Finding balance with support The fact that the classic shoulder stand requires a certain amount of balance is something that initially puts many beginners off. It requires not only balance but also a certain amount of trust to engage with this unfamiliar posture and to let go a little. Eka Pada Sarvangasana, the supported shoulder stand, helps you with this. The translation of the Sanskrit term Eka Pada Sarvangasana clearly shows you what this exercise looks like and how it supports you both physically and mentally: "Eka" means "one," "Pada" is the foot, and "Sarvangasana" is a combination of "sarva" (whole) and "anga" (body limb) and is the name for the classic shoulder stand. Eka Pada Sarvangasana is a shoulder stand in which you stand with one foot on the ground, thus supporting your balance. Eka Pada Sarvangasana: between the Supreme and the Earth Even though it's a supportive asana from yoga practice, Eka Pada Sarvangasana isn't just recommended for beginners. In this pose, you experience two poles that are important for a yogi. Through the rising body and the upward-pointing leg, you feel connected to the highest, while simultaneously rooted to the earth through the grounded leg. In this static asana, calmly focus on these two aspects. This creates security and harmony, which you need as a solid foundation for your everyday life. Your way into the shoulder stand with support Depending on your physical condition and personal preference, you basically have two ways to get into Eka Pada Sarvangasana. Either you lift the leg you want to extend from the plow position (preferably with a pillow underneath ). This variation offers yoga beginners in particular better control and control during the exercise. If you're already a somewhat experienced yogi and have mastered the classic shoulder stand, you can also lower one leg from Sarvangasana, grounding yourself in Eka Pada Sarvangasana. Image © filipfico / 123rf.com

Parshva Halasana: the twisted plough pose with a focus on flexibility and mobility

by Nick on Jan 21 2017
Parshva Halasana: the twisted plow Parshva Halasana, often referred to as Parsva Halasana or simply "revolved plow," is a yoga pose that primarily engages the shoulders, back, and neck. Among other things, it helps improve balance and promises its practitioner increased flexibility and mobility. Parshva Halasana is rated as "medium" to "slightly above average" in difficulty. It is therefore particularly recommended for more experienced practitioners or those who want to take their yoga practice to the next level. Performing Parshva Halasana The twisted plow pose puts intensive strain on several parts of the body. However, no additional equipment is required apart from a yoga mat . To perform the exercise, first lie on your back with your legs bent. Ideally, the area around your lumbar spine should be in the lower third of the yoga mat so that there is still enough space above your head. Place your arms flat next to your body, either on the back of your hands or with your palms resting on the floor. The second step is to loosen your knees and prepare for the exercise. Bring your knees straight up so that your toes point towards the ceiling. Keep your knees straight and your arms firmly anchored to the floor. Now comes the actual execution of Parshva Halasana, where you assume the "revolved plow" pose (hence the name). Lower your feet, which are currently pointing toward the ceiling, behind your head. Ideally, your feet should reach the part of the mat above your head. At this moment, your buttocks should stretch toward the ceiling. Please note that the point of this exercise is not to tense up or cause injury. So if you're not able to get your feet completely behind your head the first few times, that's okay too. Lower your legs as far as feels comfortable in your neck. However, there will always be some tension. In the next step, once your feet are behind your head, clasp your hands on the floor. First, pull one shoulder, then the other shoulder, behind or underneath your body. Your hands will interlace as you do so, creating a sense of support that also has a positive effect on the position of your shoulders. You're now in the basic position of Parshva Halasana. Here, you'll already feel how the exercise is affecting your neck, shoulders, and entire back. You'll often also feel a slight stretch in your thighs. To move into the final pose of Revolved Plough Pose, you need to twist, as the name suggests. You achieve this in the final step by moving your feet to the left side of your head. If that still feels good, bend your right knee toward the floor near your left ear. If that still feels comfortable, you can follow suit with your second knee. You should now remain in this position for at least three deep breaths. Then you can release the current Parshva Halasana position, bring your legs back to the center, and repeat the same steps on the right side of your body. Here, too, you remain in this position for at least three deep breaths, inhaling through your nose and exhaling through your mouth. After the three breaths, you can release this position and bring your legs back to the center. Then, when you're ready to complete the Parshva Halasana pose, slowly return your legs from the center position over your head to the mat. Image © lichtmeister / fotolia.com

Karnapidasana - the knee-ear pose

by Nick on Jan 18 2017
Karnapidasana - the knee-ear pose Karnapidasana, the Knee-Ear Pose, is an asana in which the knee is brought toward the ear. It is suitable for beginners and advanced practitioners. The yoga practice can be adapted accordingly if necessary. Karna means ear, pida means pressure or pain, and asana stands for posture or seat. In the following guide, you will learn exactly what Karnapidasana is, how the yoga exercise is performed, its benefits, and who should avoid the asana. What is Karnapidasana and how is the exercise performed? Karnapidasana is a very effective pose. It can be helpful for any ear-related problems, for example. You can enter this pose from either Shoulderstand (Sarvangasana) or Plough Pose (Halasana) . Extend your legs behind your head or overhead, supporting your lower back with your hands. Then slowly bend your knees and place them next to your ears. Place your arms flat on the floor behind your back, palms facing down. Beginners can support their back and bring their knees to their forehead. If this isn't possible, you don't need to bring your knees all the way to the floor. Advanced practitioners can wrap their arms around their thighs, hugging their legs with their knees next to their ears. This deepens the pose. Straighten your knees to come out of Karnapidasana and into the aforementioned Plow Pose. Then, come into Shoulderstand (Sarvangasana) and straighten your legs in the air. Then, slowly roll back to the floor. Lower your legs and hold this position for a moment. The many benefits of Karnapidasana Karnapidasana can stretch and improve the muscles of the back and legs, as well as the spine, relax the entire torso, and strengthen the spine. This helps prevent back pain. Furthermore, this yoga exercise can stimulate the abdominal organs and the thyroid, which can also benefit those with thyroid problems. The pose acts like a massage on the internal abdominal organs. Digestion is also said to be stimulated. Furthermore, the asana can be beneficial for ear problems. Blood flow to the head is increased, and the ears receive additional pressure from the knees. This helps the ears clear. It can also improve hearing. It is said to reduce menopausal symptoms and eliminate fatigue and insomnia. Furthermore, Karnapidasana promotes clear thinking and contributes to stress reduction and better sleep, as more oxygen reaches the brain, which is also calmed. The exercise allows for inner retreat, as the closing of the ears and eyes prevents external influences from penetrating. This helps you find yourself and reflect. Conclusion This is the information and tips worth knowing about Karnapidasana: how to perform the yoga exercise, its potential benefits, and what to keep in mind. The positive effects on health and the body can be diverse. The asana is generally suitable for back pain, headaches, insomnia, infertility, sinusitis, and many other problems. This yoga exercise is not recommended for pregnant women or people suffering from high blood pressure, asthma, or neck and shoulder problems. Likewise, people suffering from neck injuries or diarrhea should not perform this yoga exercise. Karnapidasana should also not be performed during menstruation. Image © inesbazdar / 123rf.com

Supta Vajrasana - Sleeping Diamond

by Nick on Jan 15 2017
Supta Vajrasana - Sleeping Diamond Supta Vajrasana, also known as Paryankasana, translates to "sleeping diamond" or "diamond sleep." It is a very popular meditation pose in yoga. It is equally suitable for men and women. Supta Vajrasana is an advanced backbend. This yoga asana can be practiced after Dhanurasana (Bow Pose) , Kapotasana (Pigeon Pose) , or Halasana (Plough Pose) . Supta Vajrasana is one of the 84 cardinal asanas. Below, you'll learn how to perform the pose, its benefits, and who should avoid it. How is Supta Vajrasana performed? To perform this yoga exercise, sit on your heels in Vajrasana. This is the starting position. Then lean back and slowly place your elbows on the floor, then bend backward. Your forearms and elbows can serve as support or as a resting place. Stretch your arms behind you. Place your right forearm first, then your left. Stay in Vajrasana, however, so that your upper body is still on the floor and your knees are bent. You can place your heels next to your buttocks and your hands next to your body. Try to keep your knees on the floor at all times. They can be slightly apart rather than leaving the floor. Close your eyes to feel a sense of relaxation throughout your body. Breathe deeply and slowly. Remain like this for a few minutes. Then turn your body onto your left side, slowly rise, and consciously allow the energy to flow. In the final pose, it is important to breathe deeply, slowly, and consciously. What effects can you achieve with Supta Vajrasana? Supta Vajrasana strengthens and stretches the thighs and abdominal muscles. The spine, knees, and ankles become more flexible, and the calves and thighs acquire a beautiful shape. Supta Vajrasana also has various health benefits. This pose can, for example, help with constipation and provide relief from sciatica, rheumatism, gout, colitis, and varicose veins. People with lower or middle back pain particularly benefit from this yoga pose, as it optimally stretches the back and hips. Furthermore, the internal organs can be stretched and stimulated, especially those in the pelvic area, such as the pancreas, liver, and kidneys. This pose is therefore particularly suitable for women, as stretching the pelvic area has a positive effect on the ovaries and fallopian tubes. This can alleviate and prevent menstrual pain. The lungs can function better because the body receives more oxygen. Supta Vajrasana can also be helpful for asthma and bronchitis. Furthermore, the exercise can activate the thyroid, the hormonal gland system. It can also reduce complications during pregnancy. It can also make childbirth easier. Mentally, Supta Vajrasana promotes greater openness and a zest for life. Conclusion The effects of the yoga exercise Supta Vajrasana can be diverse: Physically, it increases the flexibility of the back and chest. The abdominal and leg muscles are stretched, and the knees are strengthened. A pleasant stretch is generally desired, but overstretching the muscles and ligaments should be avoided. The exercise can also have mental benefits. Beginners should place a pillow under their back , and pregnant women should also place one under their hips. The knees should not be opened too wide. Supta Vajrasana is not suitable for people with neck or knee problems, sciatica, sacral disorders, or herniated discs. If unsure, consult a doctor. Image © fizkes / 123rf.com
Akarna Dhanurasana - bow and arrow

by Nick on Jan 12 2017
Akarna Dhanurasana - bow and arrow Akarna Dhanurasana, the bow and arrow yoga pose, is also suitable for people with moderate flexibility. It can be performed as part of a forward bend, for example, after Paschimothanasana, the inclined plane pose (Purvotthasana), or as a preparatory exercise to the popular Lotus Pose . Akarna Dhanurasana is one of the 84 main asanas. Instructions for Akarna Dhanurasana The starting position for this exercise is sitting in a long seat with your legs stretched out. From here, bend one leg and grab your big toe with your hand. Exhale as you do this. Then, with an inhalation, pull the toe towards your torso as close as possible. Ideally, your knee should slide past your hip. Your elbow should either move to the side or upward. This improves the flexibility of your hips and legs. The leg on your inactive side should be flat on the floor. Keep your torso upright in this position and remain like this for a few breaths. Then, with an exhalation, slowly lower your leg back to the floor and repeat the exercise on the other side or with the other leg. What effects do you achieve on the body with bow and arrow / Akarna Dhanurasana? Akarna Dhanurasana strengthens the arms and back. The feet and other muscles are strengthened and stretched, including the calf, shoulder, forearm, and gluteal muscles. The hamstrings and hamstrings become flexible, and the legs are beautifully toned. Additionally, several acupressure points are pressed when you grasp the feet as described. One point, for example, is the nerve in the big toe, which is connected to the abdominal area. This pose is also ideal for the abdomen , as it ensures muscle contraction and relaxation. The health benefits of Akarna Dhanurasana It has a harmonizing effect on digestion. Anyone suffering from constipation, upset stomach, etc., is well advised to try this exercise, as it can work wonders. This intense abdominal exercise also stimulates the lower abdominal organs, the large intestine, and the female reproductive organs. The energies in the entire abdominal region are activated. Pain in the lower abdominal area and in the larger organs can be alleviated through this yoga exercise. It can also be used for prevention. The yoga pose can also help with irregular menstruation. The exercise also opens the chest, giving the lungs room to breathe and expand. What positive effects on life are possible through Akarna Dhanurasana? In terms of mental effects, the bow and arrow helps you lead a self-determined and goal-oriented life, as well as develop decisiveness and willpower. The nerves in the hands are stimulated, which is especially beneficial for people who work a lot with their hands, such as writing or painting. It also strengthens the immune system. Conclusion The health benefits and positive effects on the body that can occur through Akarna Dhanurasana Bow and Arrow are diverse. First and foremost, it improves the flexibility of the hips and legs, and over time, you will feel more purposeful. This will benefit you in many situations throughout life. When performing the exercise, you should try to keep your hips as straight as possible. The knee of the leg resting on the floor should also ideally be straight. Akarna Dhanurasana should be avoided in some cases, for example, if you have spinal injuries. If you are unsure whether the exercise is suitable for you, you should consult a doctor beforehand. Image © byheaven / 123rf.com
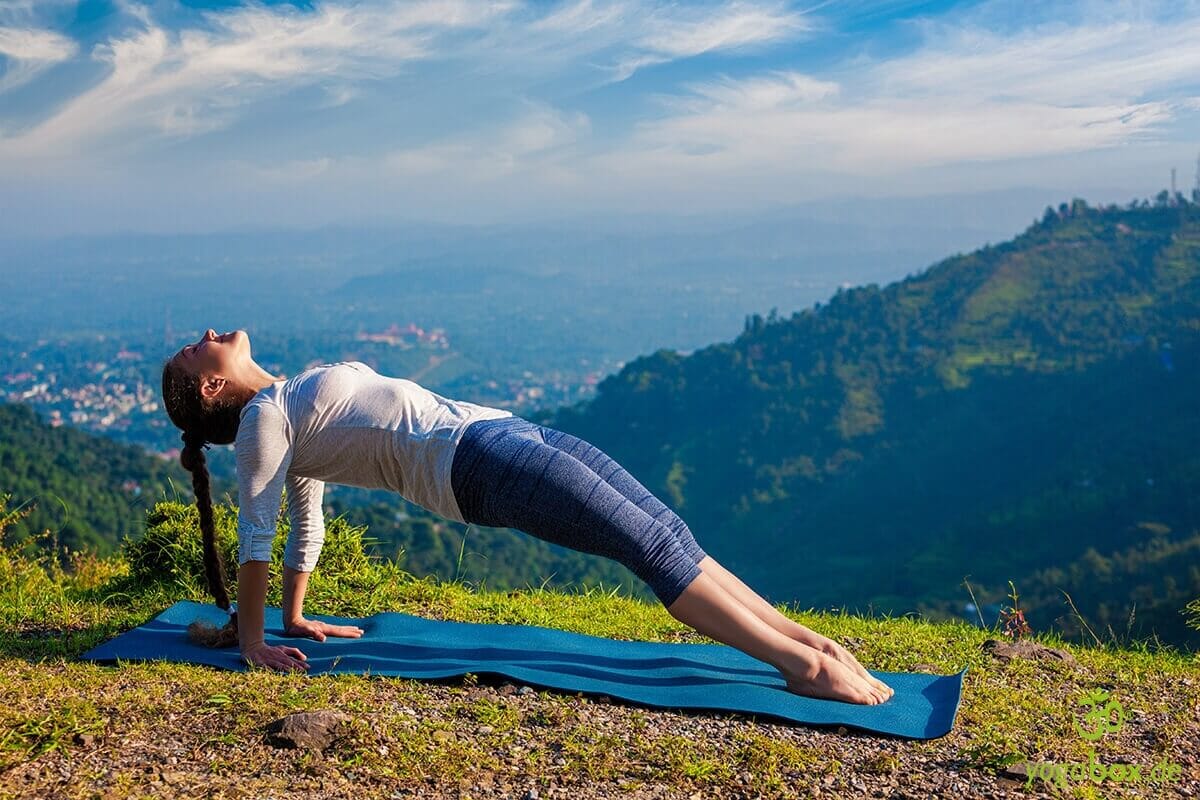
Purvottanasana - die umgedrehte Bretthaltung

Purvottanasana - the inverted plank pose

by Nick on Jan 09 2017
Purvottanasana - the inverted plank pose Purvottanasana is a popular yoga pose with a higher level of difficulty and should therefore not be performed by inexperienced beginners. The exercise focuses on strength and flexibility and engages the legs, torso, shoulders, buttocks, joints, arms, and neck. Purvottanasana translates into English as hyperextension of the front of the body and is also known as inclined plane or inverted plank pose. Because of its special shape, the asana is also called a table or plank. This yoga pose is the opposite of Paschimotthanasana (forward bend) and a good asana before cobra pose or abdominal relaxation. How to perform the yoga exercise correctly Purvottanasana is best performed on a long yoga mat and in appropriate workout clothes. You should have some yoga experience before attempting this pose. First, you need to assume the basic position of Purvottanasana, which you do by sitting on your yoga mat. Now straighten your body from the forward bend, bring your hands behind your back, and place them on the floor. Then, extend your legs with your fingers pointing backward. Your hands should be about a hand's width behind your buttocks. Next, lift your chest and pelvis and let your head hang back. Hold this position for as long as you can. Alternatively, you can rest your head on your shoulder muscles if you find that comfortable. If you have back or neck problems, you can still perform this yoga exercise, but instead of the standard pose, you should choose one of the two variations. In the first variation, you keep your head up, and in the second, you relieve pressure on your back by bending your knees. Body and mind benefit from these positive effects If you perform it correctly and regularly, both your mind and body will benefit from a variety of positive effects. Your arms can be strengthened with this exercise, and your legs and lower back will also become stronger over time. If you have tension in your lower back, this yoga pose can help relieve it. Purvottanasana stretches many different muscles. These include the calf muscles, gluteal muscles, biceps, and erector spinae. This yoga pose also strengthens the following muscles: the quadriceps, the quadratus lumborum, the longissimus dorsi, the gluteal muscles, and the latissimus dorsi. This yoga pose allows you to free yourself from all earthly habits and develop greater willpower and decisiveness. Purvottanasana addresses the three chakras Vishuddha , Anahata , and Manipura , and the pose opens an important energy field located at the front of your body. Interesting facts and tips for Purvottanasana Purvottanasana is not suitable for beginners and should not be performed by anyone with physical problems. When practicing this yoga pose, it's very important that you wear appropriate clothing and have warmed up. If you perform Purvottanasana correctly, the entire front of your body will be stretched. This pose also opens your shoulders and chest. Your entire spine is both stretched and stabilized. Purvottanasana is one of the most popular yoga poses and is an excellent balancing pose after forward bends. If the classic Purvottanasana is too easy for you, you can make the exercise more difficult. To do this, lift your pelvis very sharply, inhale, and raise one of your legs. Then exhale and lower your leg again, then repeat with your other leg. Image © dimol / 123rf.com

Gorakshasana - the cowherd pose

by Nick on Jan 03 2017
Gorakshasana - the cowherd pose Gorakshasana literally means cowherd pose and is known in Hatha Yoga as the Cowherd Pose. The asana was named after the yogi Goraksha, a great master of Hatha Yoga, and is also an alternative name for Bhadrasana in the Hatha Yoga Pradipika, where it is described in the first chapter. In the Gheranda Samhita, the Cowherd Pose is described in Chapter 2. Gorakshasana is generally considered one of the asanas that bring great success to yogis. The yoga exercise is not very difficult and is suitable for both beginners and advanced practitioners. How exactly is the yoga exercise performed? Wear appropriate clothing, warm up for a few minutes, and use a yoga mat. First, sit on your mat in Dandasana (Stick Pose) with your legs slightly bent. During Gorakshasana, don't tense your toes, neck, or hands. Don't let your gaze become fixed, even if your whole body is tense. Next, bend your knees and bring the soles of your feet together. Pull your feet a little closer to your perineum and then sit down on your feet. Your knees should be wide open. Place your hands on your feet and breathe in and out calmly. Hold Gorakshasana for a while and then return to the starting position. You can repeat this yoga pose one or two more times, then take a longer break. The execution of Gorakshasana according to Gheranda Samhita This yoga pose is very similar to Padmasana (Lotus Pose) and is also performed while sitting on a suitable support. Unlike in Lotus Pose, however, your feet are slightly wider apart in this pose, making it a less challenging position than Padmasana. In Dandasana, place your upwardly turned feet between your calves and thighs. Next, cover your heels with your hands, which are cupped together and open upwards. Perform Jalandhara Bandha and look at the tip of your nose. Then return to the starting position of Gorakshasana and repeat the pose one or two more times. What are the positive effects of Gorakshasana? The well-known yoga pose has a positive effect on your body and also on your mind when you Perform Gorakshasana regularly. This pose is ideal if you want to train your body to sit up straight. This yoga pose is generally very beneficial for your posture and your back. Your legs and ankles can also benefit from the pressure created in this yoga pose. Additionally, your feet simultaneously stimulate your second chakra . This stimulation can increase the sexual energy in your body. The pressure from below and the steady stretching of your back can also calm your digestion. For this reason, Gorakshasana is ideal if you suffer from irritable bowel syndrome. Thanks to these many benefits and positive effects, Gorakshasana is a very popular yoga pose. Things to note, tips and tricks When performing this popular yoga pose, it's important to ensure you're sitting perfectly upright. Avoid arching your back; keep your spine completely straight and your shoulders relaxed. You can also combine Gorakshasana with different pranayama techniques to achieve different results. Try different breathing techniques with this pose, and you'll see for yourself how the effects change. Do not perform this yoga pose if you have any health problems with the joints in your legs or feet. Image © OlgaKN / istockphoto.com